Saya beralih pelan-pelan ke nantinya sepenuhnya di bisnis lain, tidak begitu main lagi di IT. Tapi masa depan siapa yang tahu.
Sebenarnya karena awalnya concern di IT, saya lebih banyak menggunakan bahasa Inggris.
Tetapi di hal lain contohnya untuk trading saham, saya rasa lebih baik menggunakan bahasa Indonesia, karena saya sendiri masih kurang bagus di penggunaan bahasa Inggris apalagi untuk sesuatu yg sebenarnya bagi saya masih tergolong baru.
Saya baru memulai trading saham pada akhir Januari, tepatnya 30 Januari 2017, dan saat itu masih bekerja sebagai staff IT Infrastructure di PT. Iverson Technology, training center dan perusahaan penjual solusi Microsoft Dynamics Ax.
Di akhir Februari, saya resmi resign dari company tsb untuk menjalani kehidupan sebagai freelance IT Trainer dan selama beberapa bulan hingga sekitar Juli, saya masih menggunakan waktu sebagian utk trading saham dan sebagian lagi sebagai trainer. Tetapi selagi job training belum ada, saya menggunakan waktu sangat banyak untuk mempelajari & sekaligus terjun di trading saham. Jatah waktu yg saya berikan untuk mempelajari materi2 baru di bidang IT semakin berkurang.
Wednesday, September 27, 2017

Thursday, April 4, 2013
Windows Server 2012's Hyper-V Exported VMs Can't Be Used with Windows Server 2008 RTM/R2's Import Feature
Windows Server 2012's Hyper-V Export feature is not compatible with Windows Server 2008 RTM/R2's Hyper-V 2008
Hyper-V 2012 Export feature does not create .exp. This ".exp file" is need by Windows Server 2008 RTM or Windows Server 2008 R2's Hyper-V as format that recognized by the Import feature.
Here is the files from the old Hyper-V (Windows Server 2008 RTM / Windows Server 2008 R2). Just as an example..


compared to the new Windows Server 2012's Hyper-V..


as the result, I can't import this new VMs when in Hyper-V 2008 host.
Later, I will do research on how to import Hyper-V 2012 exported VMs on Hyper-V 2008 host. For now, I don't feel that I have time for this.
Reference:
http://social.technet.microsoft.com/Forums/en-US/winserver8gen/thread/4069d05d-131c-487c-9b84-4c9429cae955
http://www.yusufozturk.info/virtual-machine-manager/how-to-migrate-hyper-v-v3-vm-back-to-hyper-v-v2-environment.html
http://kristiannese.blogspot.com/2012/06/export-and-import-of-vms-in-hyper-v.html
Hyper-V 2012 Export feature does not create .exp. This ".exp file" is need by Windows Server 2008 RTM or Windows Server 2008 R2's Hyper-V as format that recognized by the Import feature.
Here is the files from the old Hyper-V (Windows Server 2008 RTM / Windows Server 2008 R2). Just as an example..


as the result, I can't import this new VMs when in Hyper-V 2008 host.
Later, I will do research on how to import Hyper-V 2012 exported VMs on Hyper-V 2008 host. For now, I don't feel that I have time for this.
Reference:
http://social.technet.microsoft.com/Forums/en-US/winserver8gen/thread/4069d05d-131c-487c-9b84-4c9429cae955
http://www.yusufozturk.info/virtual-machine-manager/how-to-migrate-hyper-v-v3-vm-back-to-hyper-v-v2-environment.html
http://kristiannese.blogspot.com/2012/06/export-and-import-of-vms-in-hyper-v.html
Saturday, December 6, 2008
My VIM Settings
After doing some trials and errors, I found this setting match my needs to write text documentations.
For linux, I often create a documentation for myself to review settings, learn, and practice.
This is the content of my .vimrc
:syntax enable
:syntax on
:set cmdheight=2
:set tabstop=4
:set shiftwidth=4
:set noautoindent
:set nohlsearch
:filetype off
set ruler
source /usr/share/vim/vim71/mswin.vim
behave mswin
map <S-F7> :0,$d
map <S-F8> :set autoindent smartindent shiftwidth=4
map <S-F9> :syntax on
highlight Normal guibg=grey90
highlight Cursor guibg=Green guifg=NONE
highlight lCursor guibg=Cyan guifg=NONE
highlight NonText guibg=grey80
highlight Constant gui=NONE guibg=grey95
highlight Special gui=NONE guibg=grey95
set nobackup
set nowritebackup
function L1()
execute "normal I-----------------------------------------------------------------------\o"
endfunction
function L2()
execute "normal I=======================================================================\o"
endfunction
function L3()
execute "normal I#######################################################################\o"
endfunction
function L8()
execute "normal I***********************************************************************\o"
endfunction
function Clear()
execute ":0,$d"
endfunction
:filetype off
Because when I create text documentations, sometimes I just copy-paste some text such as command-line I used in doing something, including some '#' marks in the beginning of the line. Then VIM will automatically add # for the next lines. That behavior is often not what I expected.
Maybe that's good for programming language to have a text editor that automatically guess your needs. But not for text documentations.
For me, it's something I hate when create text documentations.
Do you have any idea to share? I just do not want the VIM to insert '#' automatically.
source /usr/share/vim/vim71/mswin.vim
I used this option because I also often use Windows and get used to with Windows text editor's behaviors. If you used my VIM's settings, you should adjust the version to match your VIM version.
For linux, I often create a documentation for myself to review settings, learn, and practice.
This is the content of my .vimrc
:syntax enable
:syntax on
:set cmdheight=2
:set tabstop=4
:set shiftwidth=4
:set noautoindent
:set nohlsearch
:filetype off
set ruler
source /usr/share/vim/vim71/mswin.vim
behave mswin
map <S-F7> :0,$d
map <S-F8> :set autoindent smartindent shiftwidth=4
map <S-F9> :syntax on
highlight Normal guibg=grey90
highlight Cursor guibg=Green guifg=NONE
highlight lCursor guibg=Cyan guifg=NONE
highlight NonText guibg=grey80
highlight Constant gui=NONE guibg=grey95
highlight Special gui=NONE guibg=grey95
set nobackup
set nowritebackup
function L1()
execute "normal I-----------------------------------------------------------------------\
endfunction
function L2()
execute "normal I=======================================================================\
endfunction
function L3()
execute "normal I#######################################################################\
endfunction
function L8()
execute "normal I***********************************************************************\
endfunction
function Clear()
execute ":0,$d"
endfunction
:filetype off
Because when I create text documentations, sometimes I just copy-paste some text such as command-line I used in doing something, including some '#' marks in the beginning of the line. Then VIM will automatically add # for the next lines. That behavior is often not what I expected.
Maybe that's good for programming language to have a text editor that automatically guess your needs. But not for text documentations.
For me, it's something I hate when create text documentations.
Do you have any idea to share? I just do not want the VIM to insert '#' automatically.
source /usr/share/vim/vim71/mswin.vim
I used this option because I also often use Windows and get used to with Windows text editor's behaviors. If you used my VIM's settings, you should adjust the version to match your VIM version.
Saturday, October 25, 2008
Configure Gnome to Not Open a New Nautilus Window
When Plug a New Storage Device
I don't like the default behavior of Gnome to open a new nautilus window every time I insert a new disc or plug a new storage device (usb disk).
Here the tip to change the behavior to not open any new window.
You can use gconf-editor. If you don't have this tool, you can select and install the package from synaptic.
Go to /apps/nautilus/preferences
Un-check the 'media_automount_open'
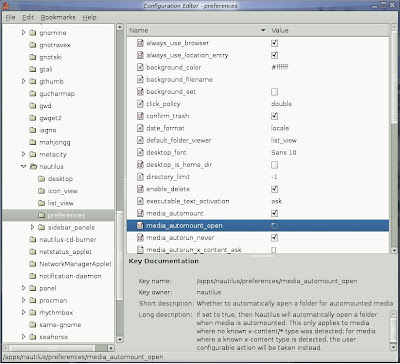
Then do testing by plug a new storage device, for example, a usb disk.
Here the tip to change the behavior to not open any new window.
You can use gconf-editor. If you don't have this tool, you can select and install the package from synaptic.
Go to /apps/nautilus/preferences
Un-check the 'media_automount_open'

Then do testing by plug a new storage device, for example, a usb disk.
Gnome Screensaver
& How To Set a Different Pictures
for some screensavers
You can set the different pictures by doing this.
I rename the original /usr/share/backgrounds to /usr/share/backgrounds.orig.
Then I create a new /usr/share/backgrounds.
Here I put some my favorite pictures.
Then I have to edit ~/.xscreensaver-getimage.cache to get quick response from gnome-screensaver to use new pictures from /usr/share/backgrounds
/usr/share/backgrounds
<enter some pictures here>
Real example of ~/.xscreensaver-getimage.cache
/usr/share/backgrounds
img0028tjd.jpg
classical-girl-010b.jpg
mir3-1280x800.jpg
Example of screensavers that use pictures:
Slidescreen

Flipscreen3d

Distort

Carousel

I rename the original /usr/share/backgrounds to /usr/share/backgrounds.orig.
Then I create a new /usr/share/backgrounds.
Here I put some my favorite pictures.
Then I have to edit ~/.xscreensaver-getimage.cache to get quick response from gnome-screensaver to use new pictures from /usr/share/backgrounds
/usr/share/backgrounds
<enter some pictures here>
Real example of ~/.xscreensaver-getimage.cache
/usr/share/backgrounds
img0028tjd.jpg
classical-girl-010b.jpg
mir3-1280x800.jpg
Example of screensavers that use pictures:
Slidescreen

Flipscreen3d

Distort

Carousel

Gnome Screensaver
& how to recover from freeze caused by some screensavers.
Ubuntu has a few screensavers by default. So I add packages: xscreensaver-data, xscreensaver-data-extra, xscreensaver-gl, and xscreensaver-gl-extra.
You can install these packages by running synaptic for easy installation steps.
Then I run 'gnome-screensaver-preferences' to select a screensaver.

Be careful to select the screensaver.
I have experienced annoying result both in Fedora and Ubuntu, problems related with screensaver. Some screensavers can freeze your xwindow. When it happened, I can not do anything in X. I have to kill gdm from a ssh client.
And that's not enough!
I have to edit the ~/.gconf/apps/gnome-screensaver/%gconf.xml
Delete the entry that contain screensaver I selected before.
Here is the example of %gconf.xml after cleaning up the troublemaker screensaver.
<xml version="1.0"?>
<gconf>
<entry name="power_management_delay" mtime="1224047772" type="int" value="30">
</entry>
</gconf>
You can install these packages by running synaptic for easy installation steps.
Then I run 'gnome-screensaver-preferences' to select a screensaver.

Be careful to select the screensaver.
I have experienced annoying result both in Fedora and Ubuntu, problems related with screensaver. Some screensavers can freeze your xwindow. When it happened, I can not do anything in X. I have to kill gdm from a ssh client.
And that's not enough!
I have to edit the ~/.gconf/apps/gnome-screensaver/%gconf.xml
Delete the entry that contain screensaver I selected before.
Here is the example of %gconf.xml after cleaning up the troublemaker screensaver.
<xml version="1.0"?>
<gconf>
<entry name="power_management_delay" mtime="1224047772" type="int" value="30">
</entry>
</gconf>
Friday, October 24, 2008
Firefox and Windows Live Hotmail Full Version
When you signed in Windows Live Hotmail, did you experience this problem?

I did not use an old Firefox browser.

This is the solution I found from the Internet, and I tried.
Type about:config for the address.

Remove the value of the general.useragent.vendor so it's blank.


After signed in, I switched to Full Version


Here I can switch to the full version of Hotmail successfully.

I see that Windows Live Hotmail is not good for small-size window.

Here the snapshot when I maximize the window.

Opera, that has no problem on using full version of Windows Live Hotmail, also has problems with small-size window like this..

Even using Internet Explorer on my Windows XP does not solve the problem. So it's about the design of Windows Live Hotmail.


I did not use an old Firefox browser.

This is the solution I found from the Internet, and I tried.
Type about:config for the address.

Remove the value of the general.useragent.vendor so it's blank.


After signed in, I switched to Full Version


Here I can switch to the full version of Hotmail successfully.

I see that Windows Live Hotmail is not good for small-size window.

Here the snapshot when I maximize the window.

Opera, that has no problem on using full version of Windows Live Hotmail, also has problems with small-size window like this..

Even using Internet Explorer on my Windows XP does not solve the problem. So it's about the design of Windows Live Hotmail.

Friday, October 17, 2008
Download Youtube Videos Using QtTube
QtTube is a good youtube videos downloader. It has graphical user interface (GUI), so it's very easy to use.

just enter the url (usually by copy-paste), type or browse for the destination folder, enter the file name, and click Get Video to start downloading.


just enter the url (usually by copy-paste), type or browse for the destination folder, enter the file name, and click Get Video to start downloading.


Download Youtube Videos Using youtube-dl
I often use this tool to download youtube videos.
To install youtube-dl:
# apt-get install youtube-dl
The usage is simple:
youtube-dl -o youtube-video-file-name.flv youtube-video-url
-o : output
Example:
$ youtube-dl -o 'red cliff mv with sub.flv' http://www.youtube.com/watch?v=xn8Wj5O1Ghc
To install youtube-dl:
# apt-get install youtube-dl
The usage is simple:
youtube-dl -o youtube-video-file-name.flv youtube-video-url
-o : output
Example:
$ youtube-dl -o 'red cliff mv with sub.flv' http://www.youtube.com/watch?v=xn8Wj5O1Ghc
Sunday, October 12, 2008
Sharing Folder in Ubuntu Using system-config-samba
Sharing folder in Linux is difficult. Agree?
Maybe yes, maybe no. Relative to the person skills.
That's my opinion.
Actually for customization, it would be better if you know how to edit directly from the /etc/samba/smb.conf. I used to do sharing by this way.
But if you do not want to edit directly, there are also some options.
One option is used this tool ini ubuntu: system-config-samba.
Unfortunately, you can not create users from this tool.
You have to create manually either using cli (command line interface) or another gui (graphical user interface) tools. Actually I'm more familiar in using useradd.
The command 'useradd' in ubuntu a little bit different than Red Hat / Fedora / CentOS.
Like this:
# useradd -m -d /home/jenny -s /bin/bash -c "Jenny Gates" jenny
-m : create home directory as specified in -d
-s : set the shell to bash (if you don't specify, defaults to sh / bourne shell)
Don't forget to set the password for the user.
# passwd jenny
Enter new UNIX password:
Retype new UNIX password:
passwd: password updated successfully
Continue with creating user for samba.
# smbpasswd -a jenny
New SMB password:
Retype new SMB password:
Added user jenny.
Then run "system-config-samba"
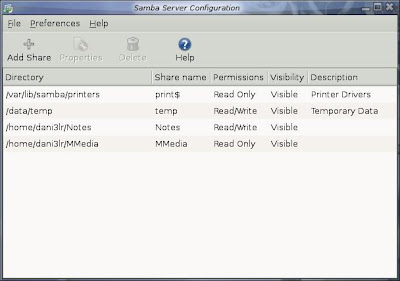
I can create a new shared folder
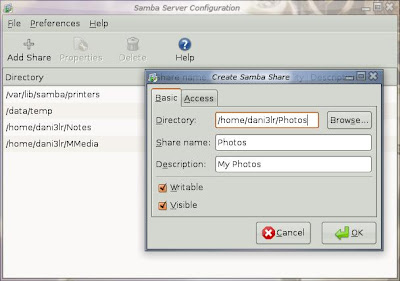
Then give access to specific users. In this scenario, to user Jenny.
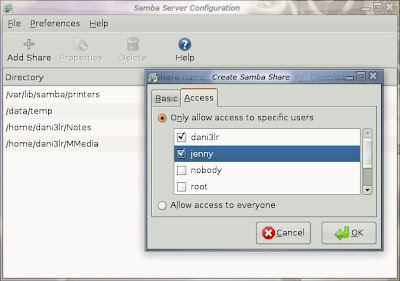
Sharing folder succeed.
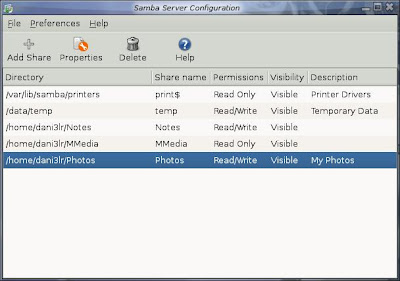
Actually the system-config-samba will modify the /etc/samba/smb.conf.
So if you want further customization for the sharing folder, you can edit directly from the /etc/samba/smb.conf.
system-config-samba may help if you are more familiar with gui, and want to share folders as soon as possible in an easy way.
Maybe yes, maybe no. Relative to the person skills.
That's my opinion.
Actually for customization, it would be better if you know how to edit directly from the /etc/samba/smb.conf. I used to do sharing by this way.
But if you do not want to edit directly, there are also some options.
One option is used this tool ini ubuntu: system-config-samba.
Unfortunately, you can not create users from this tool.
You have to create manually either using cli (command line interface) or another gui (graphical user interface) tools. Actually I'm more familiar in using useradd.
The command 'useradd' in ubuntu a little bit different than Red Hat / Fedora / CentOS.
Like this:
# useradd -m -d /home/jenny -s /bin/bash -c "Jenny Gates" jenny
-m : create home directory as specified in -d
-s : set the shell to bash (if you don't specify, defaults to sh / bourne shell)
Don't forget to set the password for the user.
# passwd jenny
Enter new UNIX password:
Retype new UNIX password:
passwd: password updated successfully
Continue with creating user for samba.
# smbpasswd -a jenny
New SMB password:
Retype new SMB password:
Added user jenny.
Then run "system-config-samba"

I can create a new shared folder

Then give access to specific users. In this scenario, to user Jenny.

Sharing folder succeed.

Actually the system-config-samba will modify the /etc/samba/smb.conf.
So if you want further customization for the sharing folder, you can edit directly from the /etc/samba/smb.conf.
system-config-samba may help if you are more familiar with gui, and want to share folders as soon as possible in an easy way.
Saturday, October 4, 2008
How Linux Access Windows Shared Folder?
It's easy. Just open the nautilus browser, and on the Location textbox, type:
smb://ip-address-of-file-server/shared-folder
for example:
smb://192.168.3.60/temp
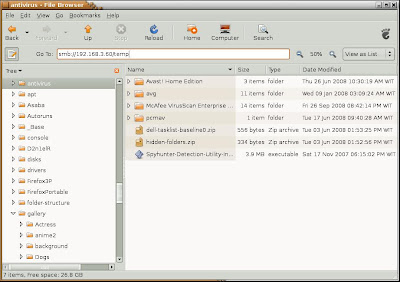
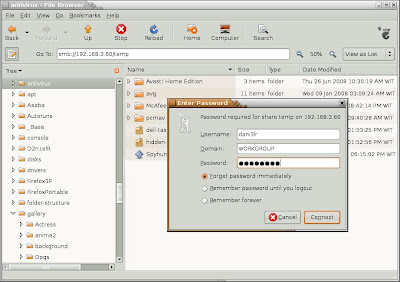
You will be have a window asked your username and password to the file server.
Then you can browse just like any other folders in your linux.
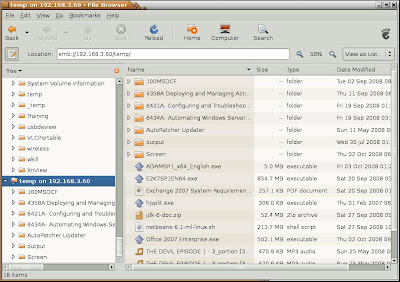
Viewing pictures as thumbnails is also OK. You just need to edit of your nautilus browser preferences.
Go to Edit menu, select Preferences, click the Preview tab.
On the Other Previewable Files area, set the Show Thumbnails: Always.
(If not, it defaults to Local Files Only, and you can see the icons only).
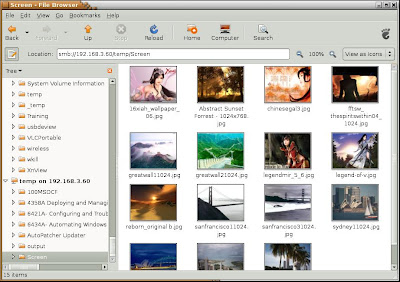
smb://ip-address-of-file-server/shared-folder
for example:
smb://192.168.3.60/temp

You will be have a window asked your username and password to the file server.

Then you can browse just like any other folders in your linux.

Viewing pictures as thumbnails is also OK. You just need to edit of your nautilus browser preferences.
Go to Edit menu, select Preferences, click the Preview tab.
On the Other Previewable Files area, set the Show Thumbnails: Always.
(If not, it defaults to Local Files Only, and you can see the icons only).

Thursday, October 2, 2008
Gnome Terminal
How to remember Window's position and size
It's annoying that everytime I resize the gnome terminal window. It never remember!
After googling, I found this really helpful information. and I try it..
I press [ALT] + [F2] to launch 'Run Application', then type:
gnome-terminal --geometry=123x38+0-0
It seems fit to my desktop with resolution of 1280x800.
For later use, I create a Custom Application Launcher (shortcut) on the panel, like this:


After googling, I found this really helpful information. and I try it..
I press [ALT] + [F2] to launch 'Run Application', then type:
gnome-terminal --geometry=123x38+0-0
It seems fit to my desktop with resolution of 1280x800.
For later use, I create a Custom Application Launcher (shortcut) on the panel, like this:


Wednesday, October 1, 2008
Dual-Monitor in Ubuntu 8.04 (Hardy Heron)
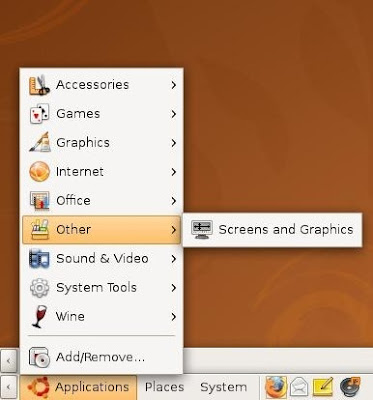
First, check on Applications menu, Other, Screens and Graphics.
If Other or Screens and Graphics does not exist, probably it was not enabled for the Applications menu.
You should go to System menu, Preferences, Main Menu. On Applications group, select Other. Then mark enable for Screens and Graphics.
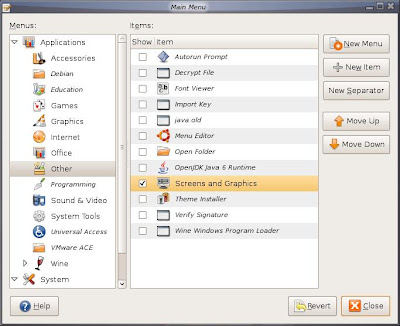
Click Applications menu, Other, Screens and Graphics
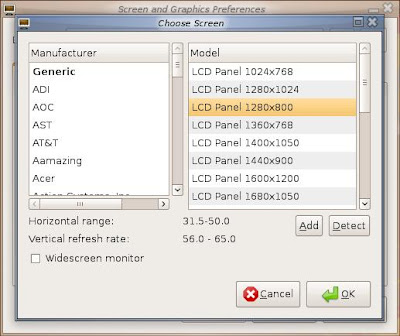
On the left, make sure that Screen 1 is selected. On Model, select Generic LCD Panel 1280x800 (I assumed that most laptops come with support for this resolution). Many projectors, old monitors does not support widescreen. So I did not select Widescreen monitor option. If you select this, I'm afraid that later you find problems with the second screen (screen 2).
Then click OK.
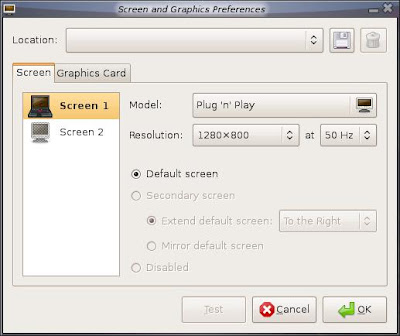
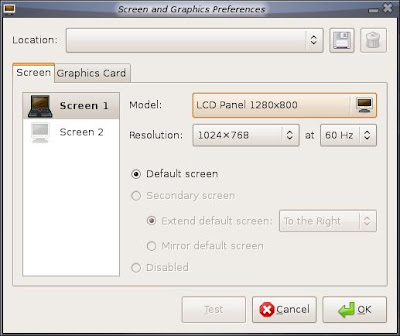
On the Screen 1, on the Resolution, change to 1024x768. If not, we have problems with monitors or projectors that support maximum resolution of 1024x768. Screen 1 has already been selected as Default screen.
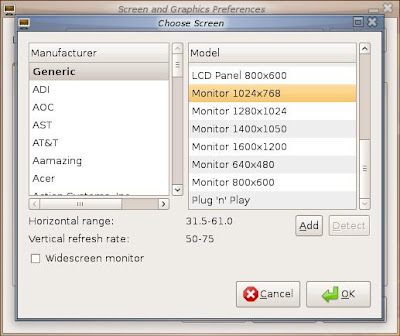
On the left, click Screen 2, then click Model. Set to Generic Monitor 1024x768. (I assume that at least our monitor support max resolution of 1024x768). Then click OK.
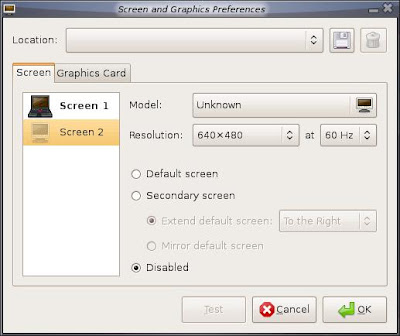
On the Screen 2, select Resolution, and set to 1024x768.
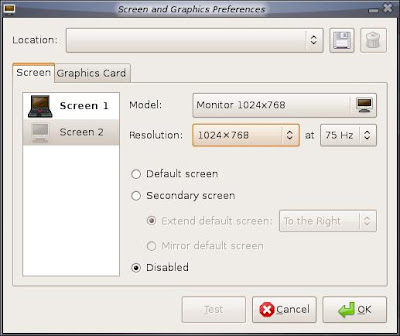
Then select Secondary Screen option, select Mirror to default screen.
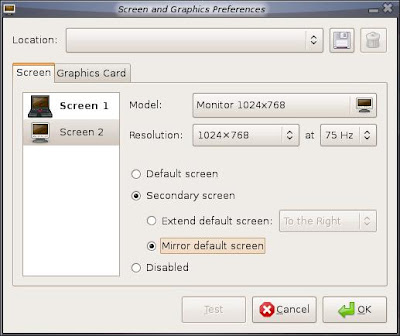
In this post, I select Generic LCD or Generic Monitor. You have the options to select the model that really suitable for your own monitors.
Now you can continue with testing with the second monitor.
Good luck.
If Other or Screens and Graphics does not exist, probably it was not enabled for the Applications menu.
You should go to System menu, Preferences, Main Menu. On Applications group, select Other. Then mark enable for Screens and Graphics.

Click Applications menu, Other, Screens and Graphics

On the left, make sure that Screen 1 is selected. On Model, select Generic LCD Panel 1280x800 (I assumed that most laptops come with support for this resolution). Many projectors, old monitors does not support widescreen. So I did not select Widescreen monitor option. If you select this, I'm afraid that later you find problems with the second screen (screen 2).
Then click OK.


On the Screen 1, on the Resolution, change to 1024x768. If not, we have problems with monitors or projectors that support maximum resolution of 1024x768. Screen 1 has already been selected as Default screen.

On the left, click Screen 2, then click Model. Set to Generic Monitor 1024x768. (I assume that at least our monitor support max resolution of 1024x768). Then click OK.


On the Screen 2, select Resolution, and set to 1024x768.

Then select Secondary Screen option, select Mirror to default screen.

In this post, I select Generic LCD or Generic Monitor. You have the options to select the model that really suitable for your own monitors.
Now you can continue with testing with the second monitor.
Good luck.
Sunday, September 28, 2008
Enhance the Look of Audacious

What is Audacious?
There was Winamp, a very popular media player to play MP3 and other media formats in Windows. Then there was a clone in Linux named XMMS. Now, Audacious, that is also a clone of Winamp.
As a clone, we can use various skins, plugins, presets from Winamp.
Audacious in Ubuntu comes with very few skins.
To enhance the look, you can download the Winamp skins from:
http://www.winamp.com/skins
Copy the downloaded skins (*.wsz) to ~/.local/share/audacious/Skins/
Then run the Audacious.
Right-click on the Audacious, select Preferences (CTRL-P).
Click Appearance. Click Refresh Skin list button. On the Skin list box, select the skin you like.
Example of skins (my favorites):
Expensive_HI-FI-1.2

WilD GlazE

Neoclassic_V_1_2

n3ON

Alien_Assault_v1

Subscribe to:
Posts (Atom)